Spark Tutorial - Environment Setup
Standalone Test Environment Installation Guide

Introduction
What is Apache Spark
Apache Spark is an open-source distributed data processing engine used for large-scale data analysis, data engineering, and machine learning workflows. Unlike traditional single-machine data processing tools, Spark splits large datasets into multiple tasks and distributes them across different nodes to run in parallel, which boosts both processing efficiency and scalability.
One of Spark’s biggest advantages is in-memory computing. Traditional data processing frameworks frequently write intermediate results to disk, while Spark can cache frequently used data in memory, cutting down on disk I/O. This makes a real difference in scenarios that require repeated iterative computation — think machine learning or interactive analysis — where Spark noticeably outperforms disk-bound approaches.
Spark also uses a distributed computing model that scales from a single machine all the way up to a large cluster. Developers don’t need to manage data partitioning, task scheduling, or inter-node communication by hand — you just describe your data processing logic through Spark’s high-level APIs (DataFrame, SQL, RDD), and Spark takes care of splitting and distributing the work automatically. This, in my experience, is what makes it far more approachable than the earlier Hadoop ecosystem.
Spark supports multiple languages — Scala, Python, Java, and R — and ships with modules like Spark SQL, Structured Streaming, and MLlib, making it suitable for data analysis, real-time stream processing, ETL pipelines, and machine learning.
In short, Apache Spark can be thought of as a “high-speed distributed computing platform built for large-scale data,” letting data engineers handle datasets that traditional single-machine tools simply can’t keep up with.
Apache Spark vs. Common Data Processing Tools
| Tool | Primary Role | Computing Model | In-Memory Processing | Distributed Capability | Best For |
|---|---|---|---|---|---|
| Apache Spark | Large-scale distributed data processing engine | Distributed parallel computing | ✅ Strong (Cache / Persist support) | ✅ Native support | Big Data ETL, data analysis, machine learning, streaming |
| Pandas | Python data analysis library | Single-machine | ✅ Primarily in RAM | ❌ No native distributed support | Small-to-medium data analysis, data cleaning, exploratory analysis |
| Dask | Python distributed data analysis framework | Parallel computing | ✅ In-memory support | ✅ Multi-node support | Pandas users handling larger datasets |
| Polars | High-performance DataFrame library | Single-machine parallel | ✅ Primarily in RAM | ⚠️ Has a distributed option | High-performance analysis, Pandas replacement |
| Apache Hadoop MapReduce | Traditional batch big data framework | Disk-based MapReduce | ❌ Relies on disk I/O | ✅ Native support | Large-scale batch processing |
| Apache Flink | Real-time stream processing platform | Distributed stream computing | ✅ State management support | ✅ Native support | Real-time streaming, event processing |
Choosing the Right Tool for the Job
| Scenario | Recommended Tool |
|---|---|
| Small-scale analysis, notebook exploration | Pandas / Polars |
| Large ETL pipelines | Apache Spark |
| TB-scale data processing | Apache Spark / Hadoop |
| Real-time event stream processing | Apache Flink / Spark Structured Streaming |
| ML data preprocessing | Apache Spark + MLlib |
Before You Begin
Before diving into today’s topic, let’s get the tools and versions in place.
Version Reference
| Software | Version |
|---|---|
| Virtual Machine | 7.1.4 (or later) |
| Redhat ISO | 9.8 |
| Java openjdk | 17.0 |
| Spark | 4.2.0 |
Virtual Machine Installation
- This guide uses the VM type most commonly seen in Taiwan’s industry for the installation. Official ISO download link (just grab the latest boot ISO).
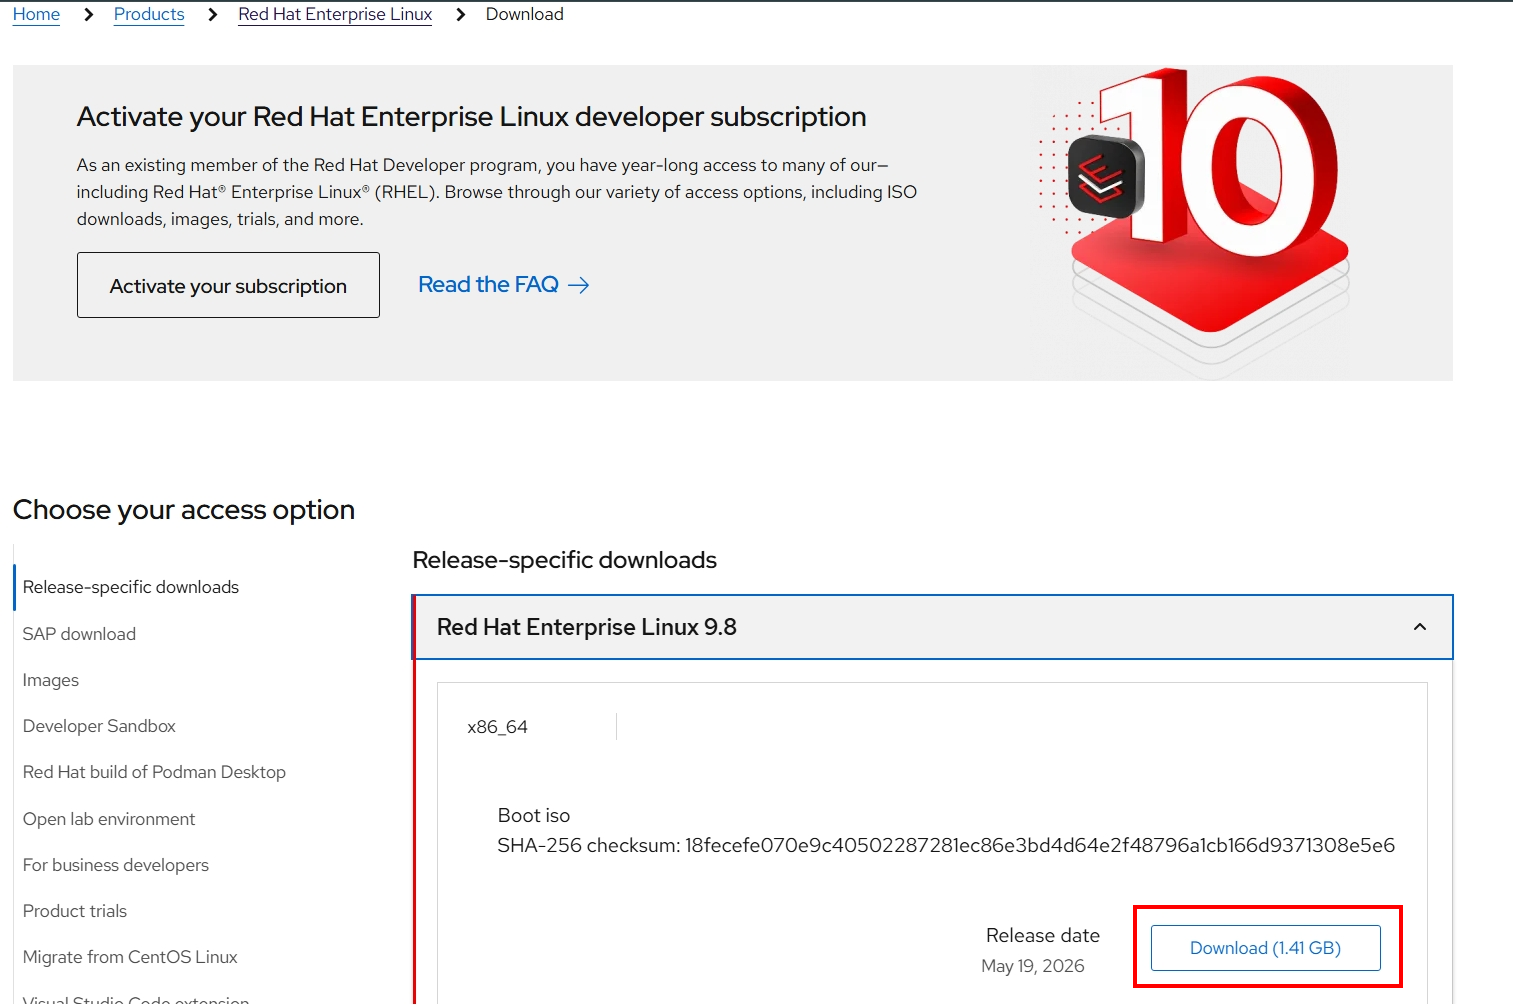
- You’ll need a Red Hat account both to download the ISO and to connect to Red Hat repos later. You can sign up for the Developer Program at the Developer portal, which lets you download RHEL for free (for personal development and testing).
- During the VirtualBox installation process, when you see the following screen, be sure to select Connect to Red Hat.
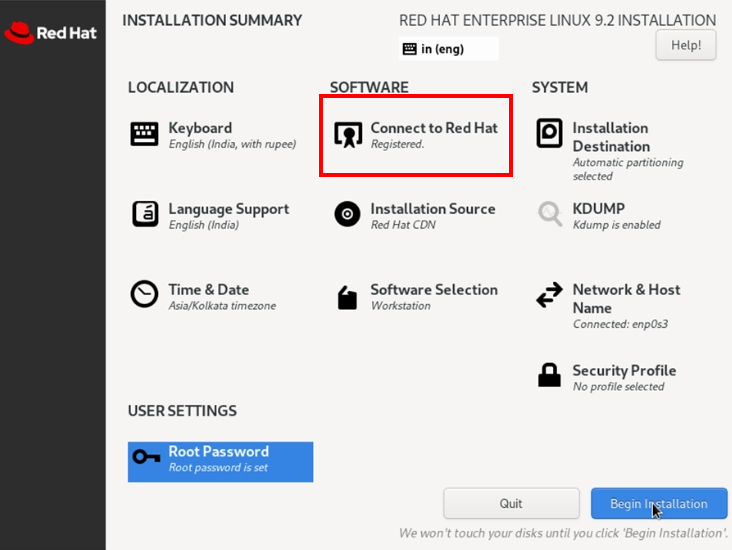
- Once installation finishes, open a terminal and run the following command to confirm the repo connection is working:
As long as there’s no error and you see output similar to the screenshot below, the connection is good.
1yum repolist -v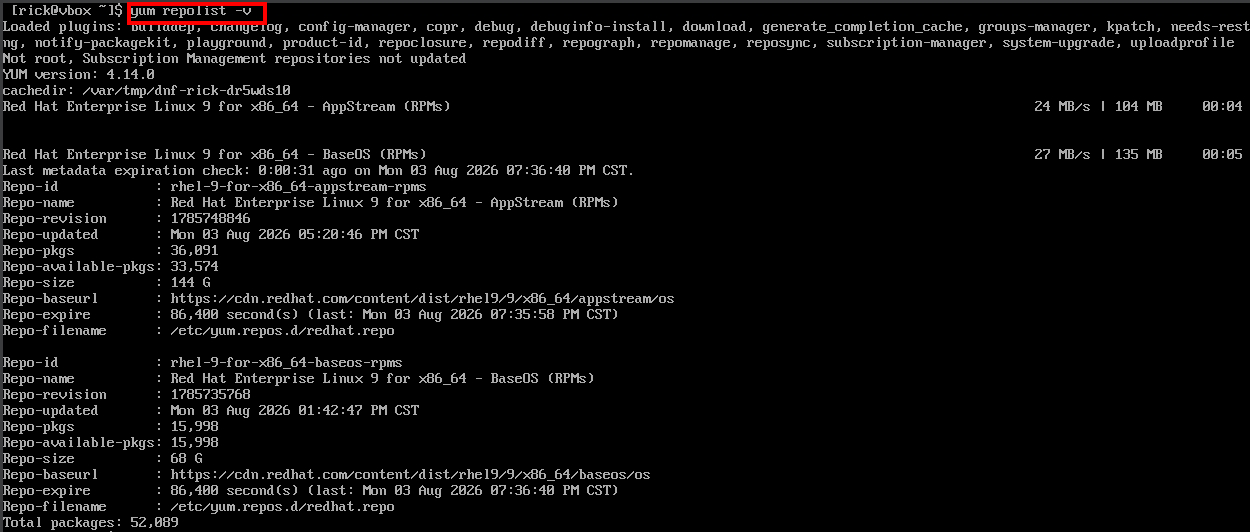
At this point, you have a working VM ready to go — next, let’s install the packages Spark needs.
Installing Spark
Head to the Apache Spark website and download a current release (we’ll deal with dependencies as they come up via error messages when starting the service, no need to get everything sorted up front).
- On the official site, select the latest version, 4.2.0, along with the Pre-Built package.
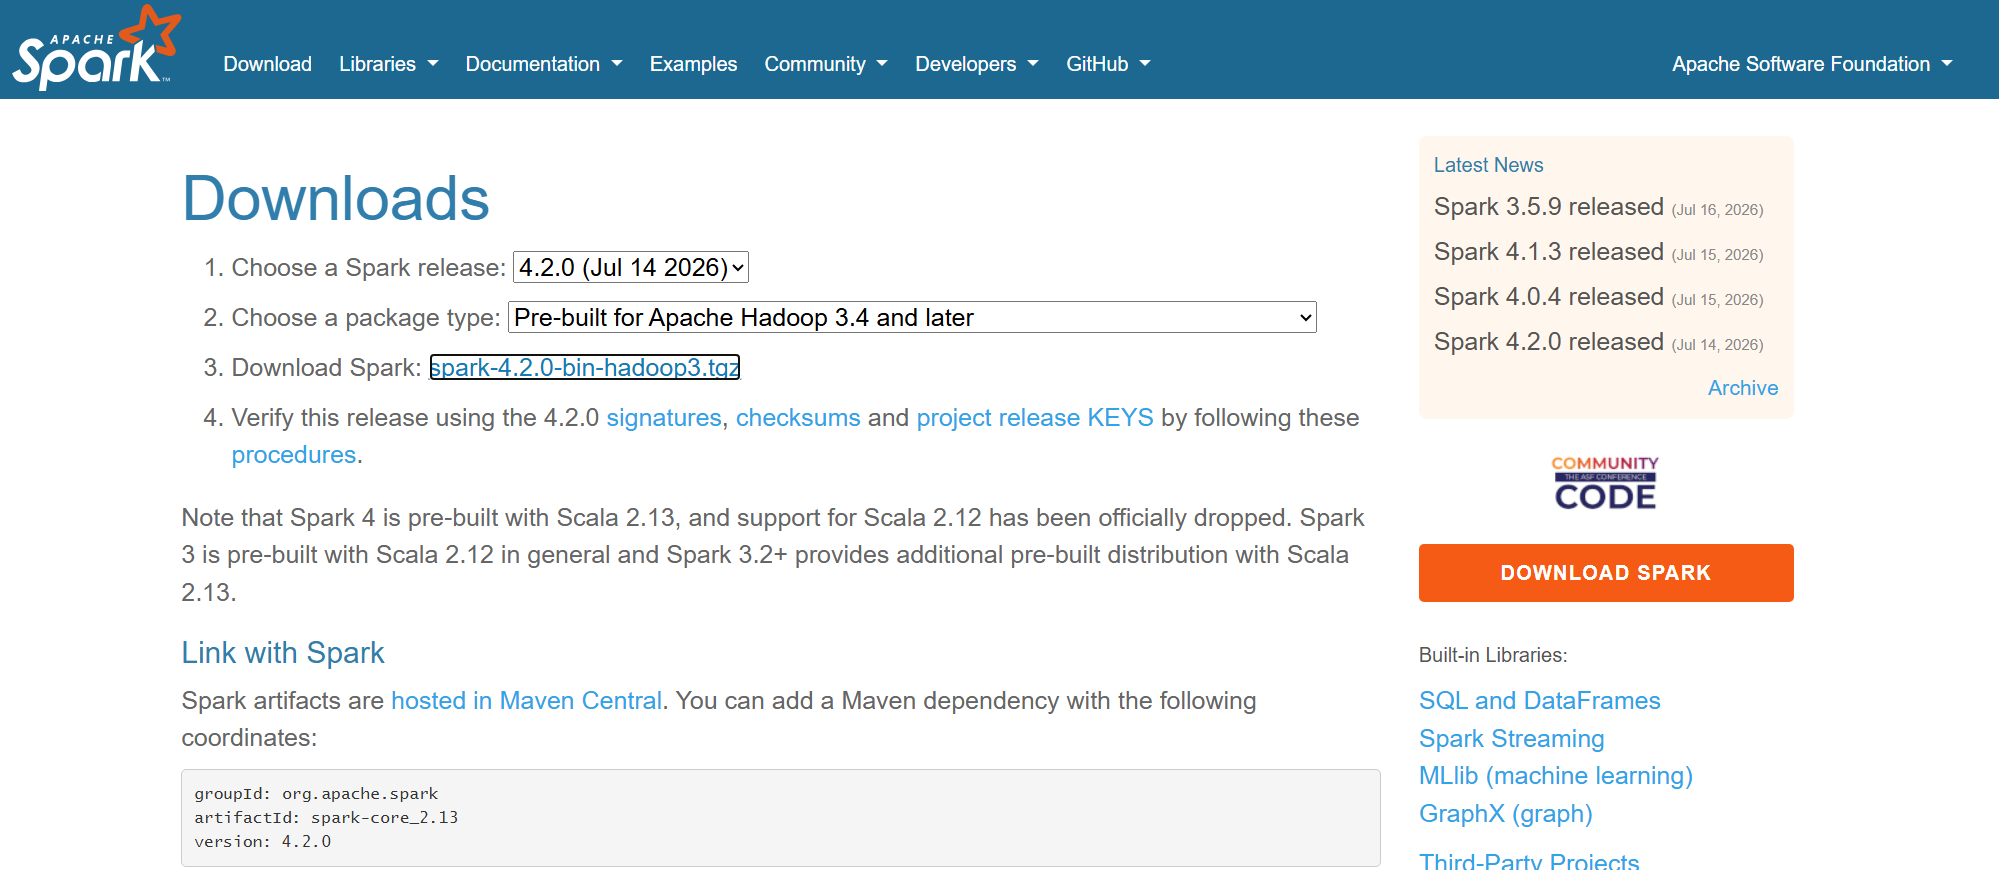
- Clicking the download-spark link from the previous screenshot takes you to the next page. Copy the URL highlighted in red and go back to your VM to
wgetit:1 2 3 4 5cd ~ mkdir spark wget <spark.tgz package URL> tar zxvf <spark.tgz package> # extract the archive rm -rf <spark.tgz package> && cd <extracted spark folder>
Setting Environment Variables
-
After entering the extracted folder, try starting the service and you’ll hit this error:
1 2 3cd <extracted spark folder> cd <extracted spark folder>/bin ./spark-shell # prompts you to set JAVA_HOME Warning
This is the most common snag for newcomers: Spark doesn't ship its own JVM, so before starting it up you need to make sure `JAVA_HOME` is set correctly — and that the Java version matches what Spark actually requires. Even if Java is installed, spark-shell won't start if this isn't right. -
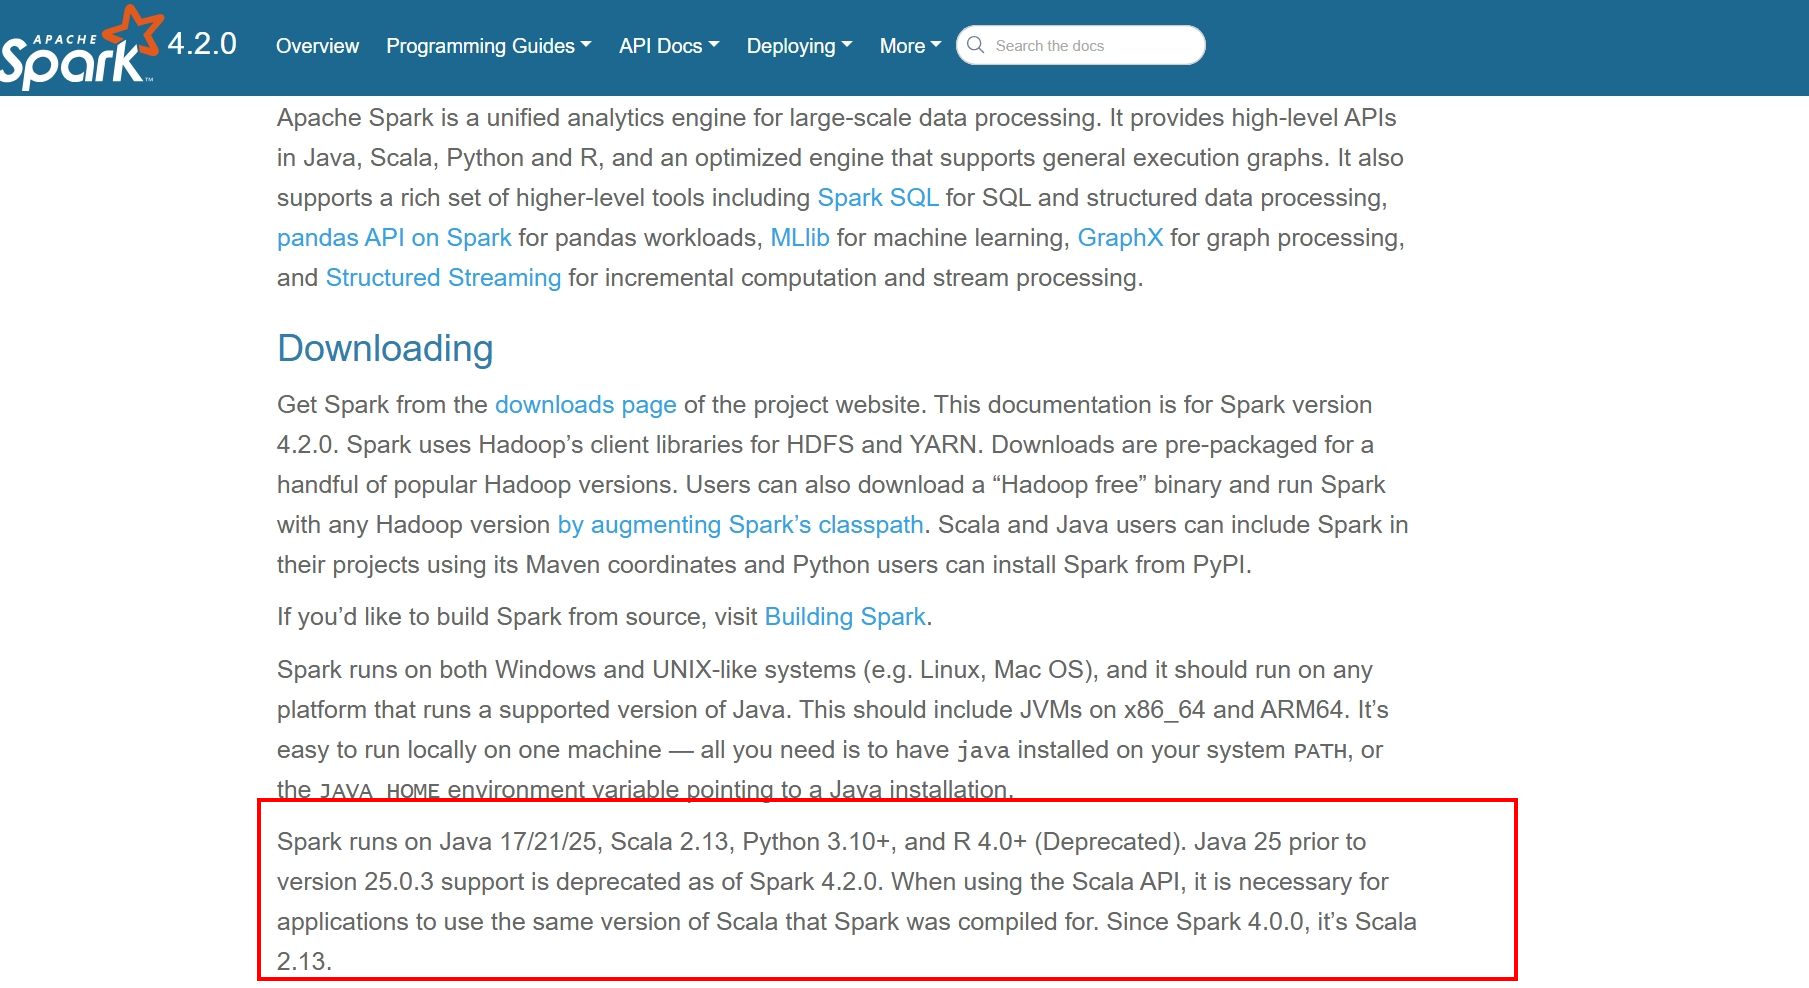
Check the official docs for the latest release to confirm which Java version that Spark version requires (latest docs). Currently it needs Java 17 / 21 / 25 — this guide uses Java 17.
-
Install Java 17 in the terminal:
1 2 3 4 5 6 7 8 9 10 11yum search java sudo yum install java-17-openjdk-headless.x86_64 readlink -f $(which java) # returns /usr/lib/jvm/java-17-openjdk-17.0.20.0.8-1.2.el9.x86_64/bin/java export JAVA_HOME=/usr/lib/jvm/java-17-openjdk-17.0.20.0.8-1.2.el9.x86_64 export PATH=$JAVA_HOME/bin:$PATH vi ~/.bashrc # append the following at the bottom, then :wq to save export JAVA_HOME=/usr/lib/jvm/java-17-openjdk-17.0.20.0.8-1.2.el9.x86_64 export PATH=$JAVA_HOME/bin:$PATH source ~/.bashrc # reload to apply -
Set the
SPARK_HOMEpath (optional, but convenient).TipOnce `SPARK_HOME` is set, you can run `spark-shell` directly from anywhere, instead of having to `cd` into the Spark folder every time and run it with `./`. It's a small step, but it saves a lot of hassle over the long run.1 2 3 4vi ~/.bashrc # append the following at the bottom, then :wq to save export SPARK_HOME=/home/rick/spark/spark-4.2.0-bin-hadoop3 export PATH=$SPARK_HOME/bin:$PATH source ~/.bashrc # reload to apply -
Verify the environment variables took effect:

Successful Startup and Follow-Up Checks
Starting the Service
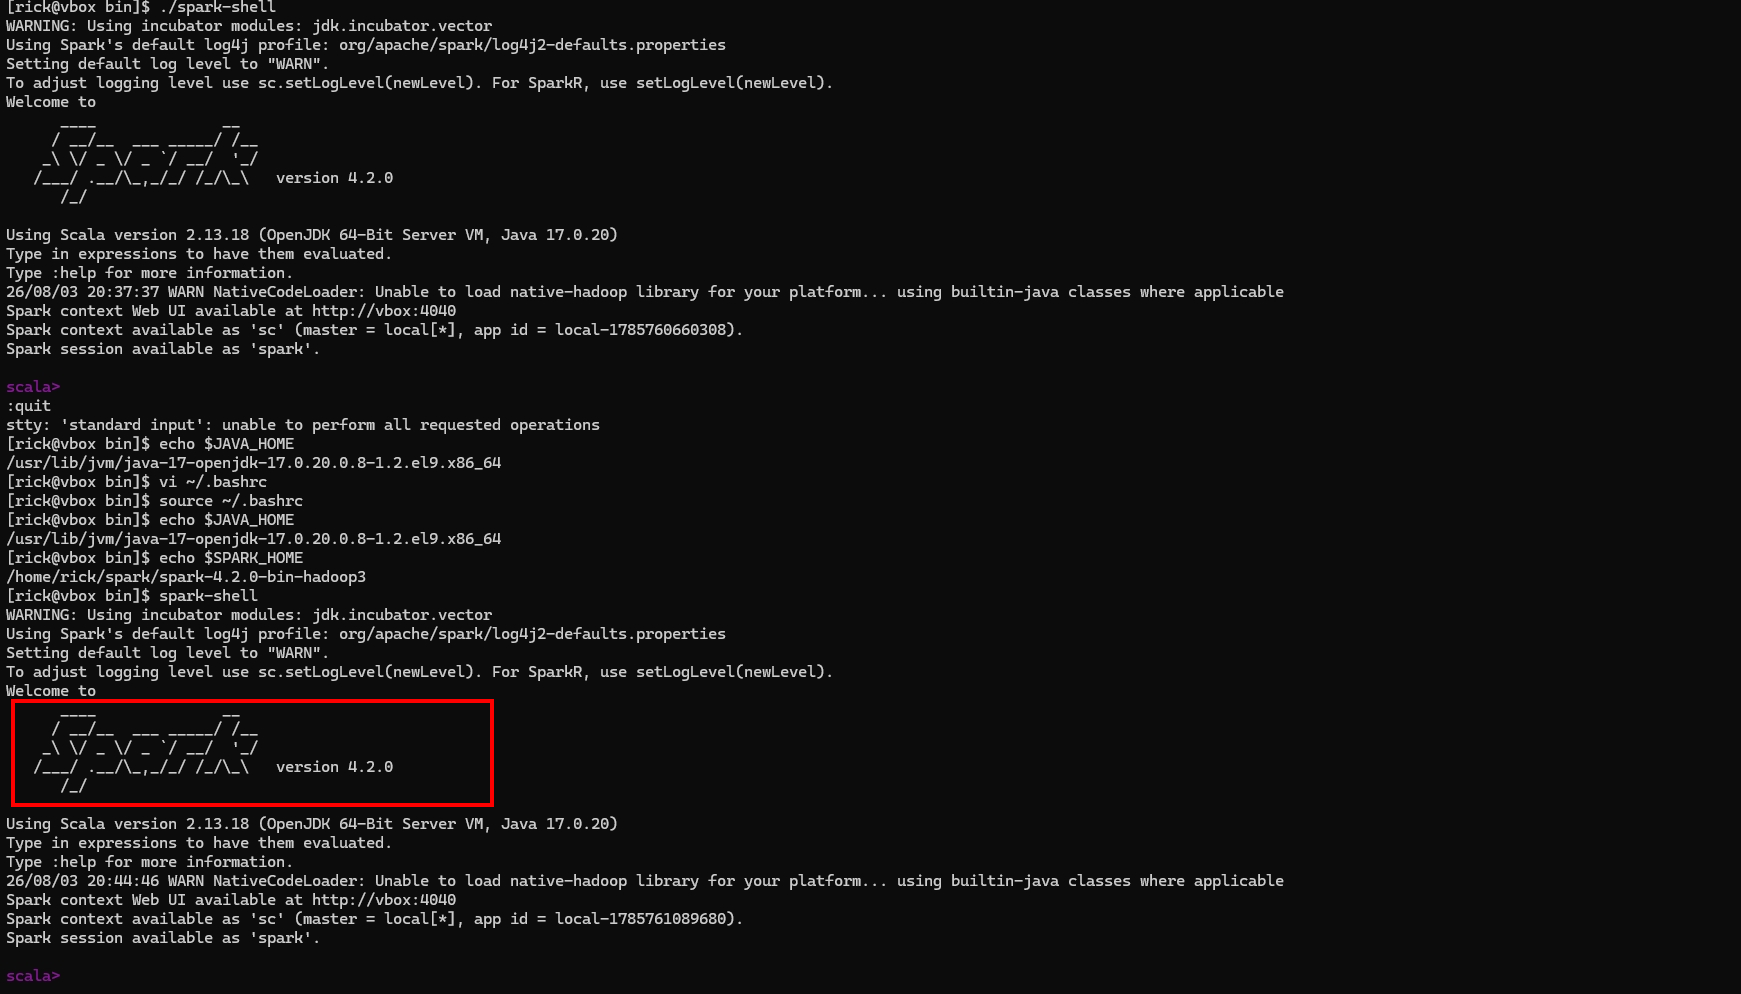
Run the following command — if you get output similar to the screenshot below, the installation succeeded and the environment is working properly:
|
|
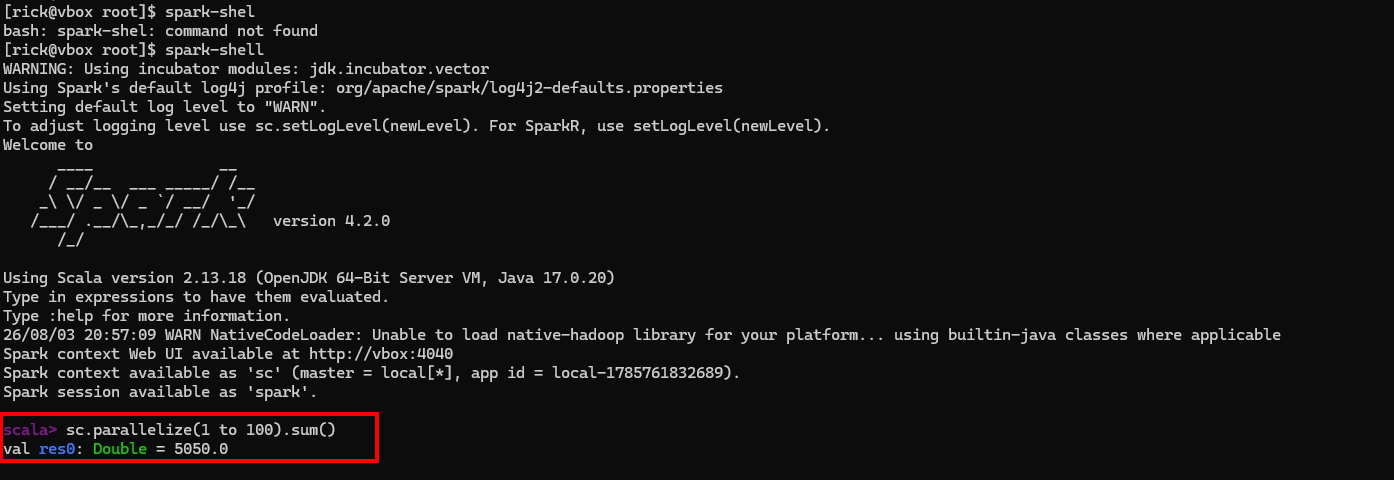
RDD Test: Summing 1 to 100
|
|
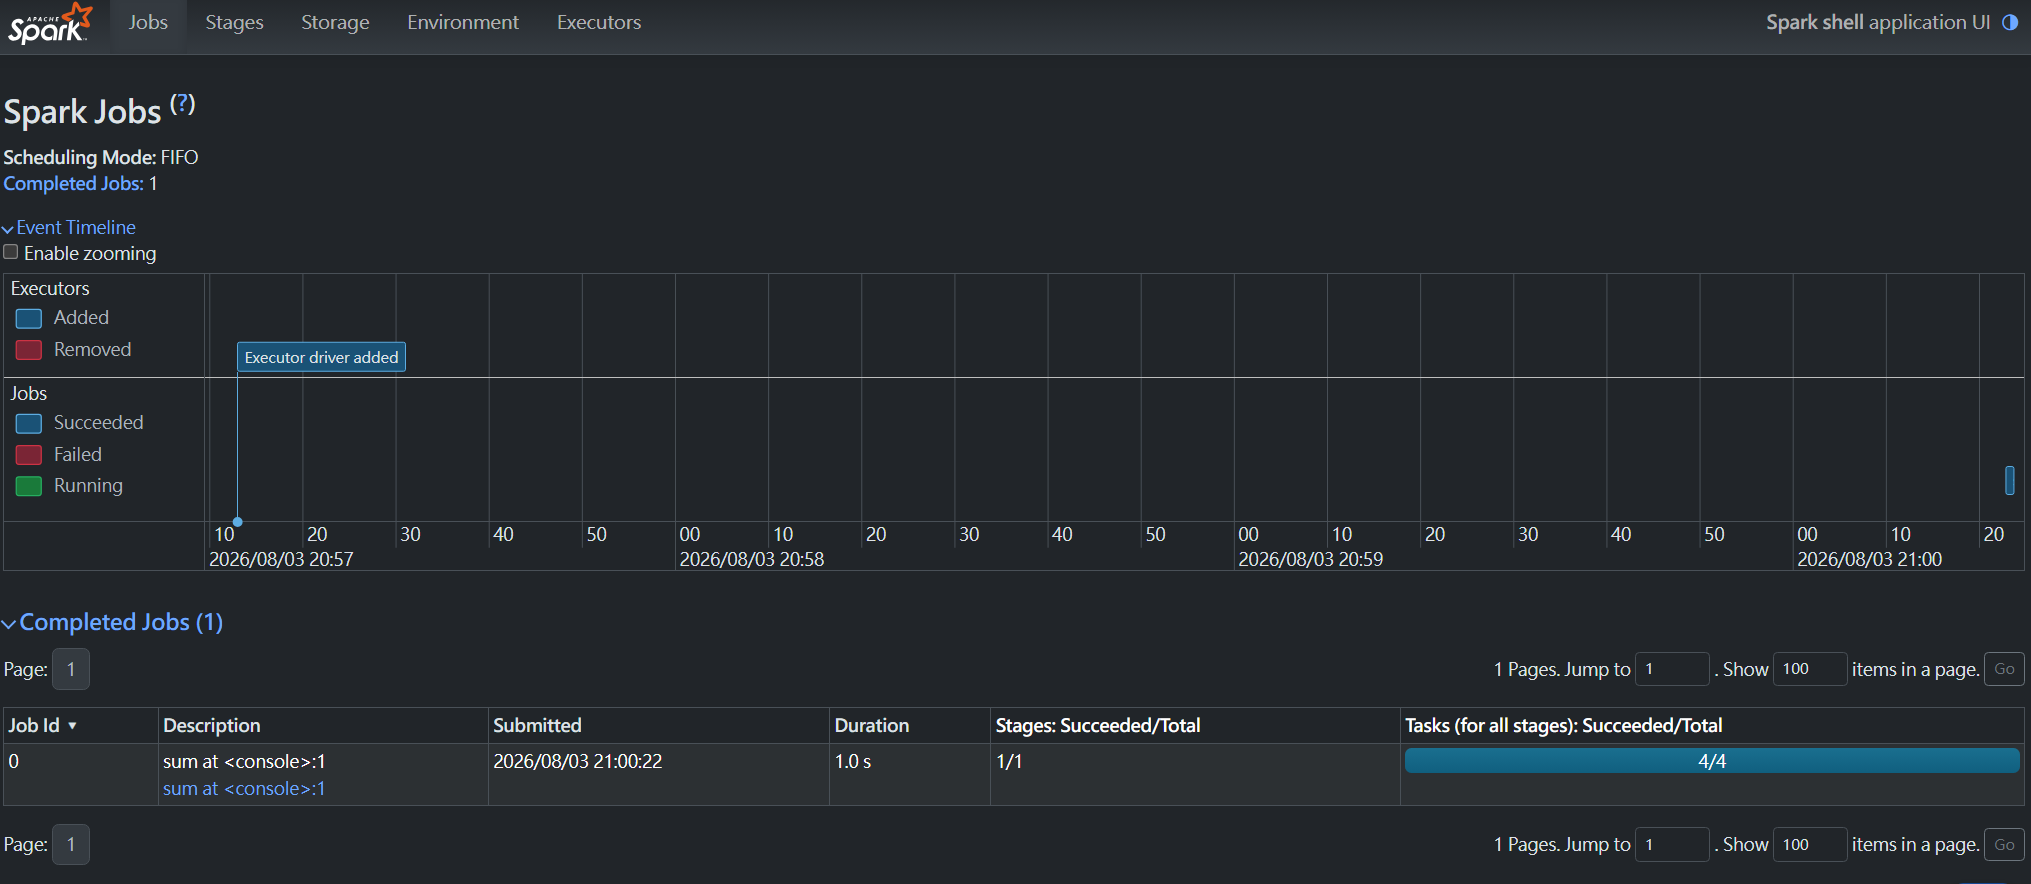
Checking the Web UI
This step requires opening up the firewall so external systems can connect in. The Spark UI runs on port 4040 by default.
--permanent flag makes the rule persist across firewall restarts — effectively opening this port permanently. If this is just a test environment you’ll tear down afterward, consider skipping --permanent, or remember to remove the rule once you’re done, to avoid leaving an unnecessary service exposed long-term.
|
|
Closing Thoughts
If you’re used to processing data with Python and Pandas, you’ve probably run into its limits at scale: no native distributed support to scale up performance, and processing speed that starts to drag once data volume grows. Spark happens to solve exactly these pain points. It’s also worth noting that Spark supports a SQL-like syntax for data processing, which makes the learning curve a bit gentler than you might expect.
In my experience, this is one of the most worthwhile skills to invest time in among large-scale ETL tools.